Published by Ahmad Jamal on May 16, 2023 | Last updated on May 20, 2023
There are a handful of possibilities that would cause a shark vacuum roller brush error that needs interfering.
Whether you need to unclog it, fix it, clean it, or just make sure it’s working properly, you’ll need to know how to remove roller brush from shark vacuum properly.
In this CleanersAdvisor guide, we’ll walk you through the process every step of the way, from removing the first screw, until reinstalling everything back on.
Moreover, we’ll have a picture that explains every step that you’ll need to carry on.
Read through for more insight on How to Remove Roller Brush From Shark Vacuum.
Important Tips Before Removing Roller Brush From Shark Vacuum
1. Read the user manual thoroughly before doing any single step.
2. Always unplug the vacuum from the power source as a first step before attending to any vacuum component.
3. Shark vacuums differ in many things, this means that understanding the concept of every step is essential to help you master the whole process, instead of following it by the letter.
4. Always ask the kids and pets to be somewhere else while you deal with your shark vacuum’s components, as they can easily swallow a screw or interfere with your work.
How to Remove Roller Brush From Shark Vacuum
1. Remove Screws
2. Remove Cover
3. Remove the Belt
4. Remove the Roller Brush
5. Replace Connectors or Wheels If Necessary
1. Removing Screws
The first step in How to Remove Roller Brush From Shark Vacuum is removing the visible and hidden screws on your vacuum’s cover.
As we recently did with our guide on how to take apart shark lift away vacuum, we’ll do this on the Shark Lift Away NV352 model.
In this model, you have 10 screws in total, 6 that are visible and easy to find, 4 that are harder to find.
Luckily, the user manual can help you with finding them.
But we’ll cut through the time and effort needed, as you’ll find the 6 put in RED in this picture, those are the easy to find screws.
The 4 screws in yellow are the harder to find ones, as you’ll need to search for them in the upper 2 screws, and remove the metal thing to reach and remove the lower 2 screws.

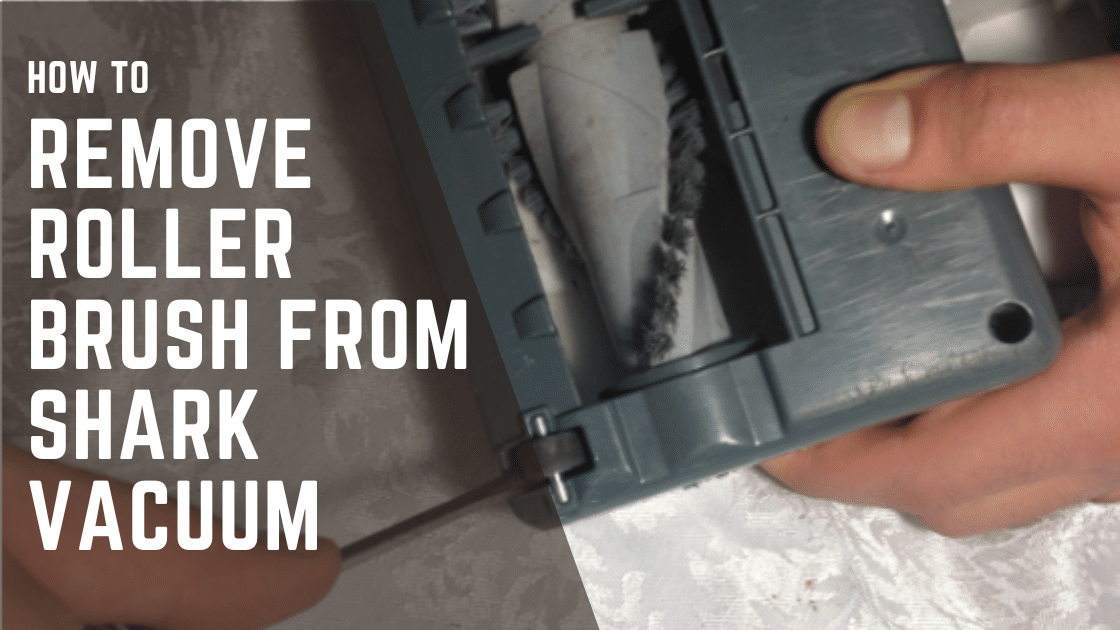
2. Removing Cover
Once you have removed all the screws, save them in a safe place where you’ll need them to reinstall everything back from the start.
Now, carefully remove the cover by lifting it off the whole vacuum head, and make sure you don’t drop the other part to the ground.
Just carefully remove the cover, then leave the other part on the ground while you put the cover to the side, awaiting the reinstalling.
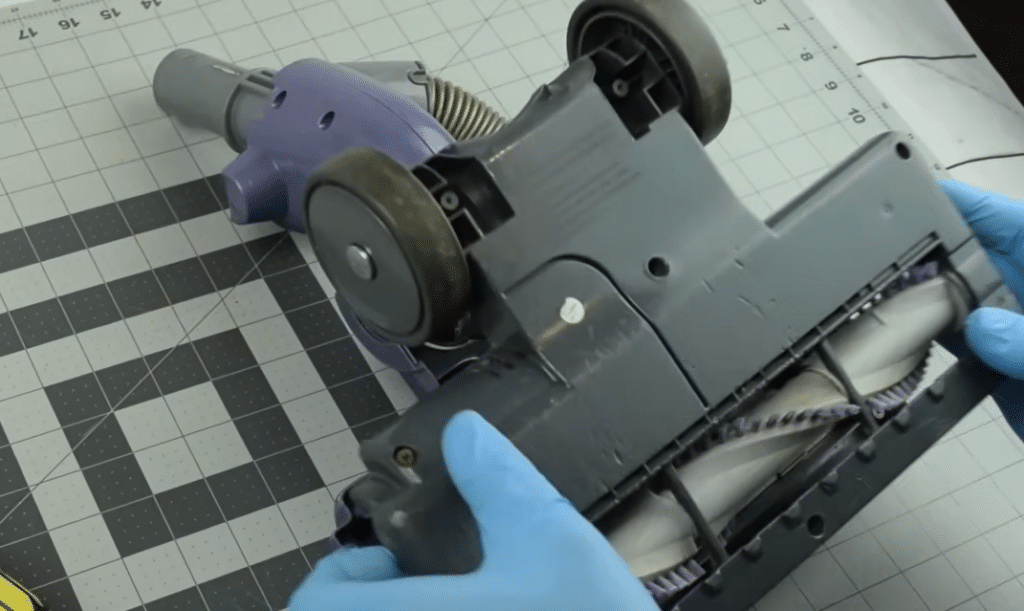
3. Removing the Belt
You can closely notice the roller brush and the belt on the vacuum head now, without the cover.
Don’t try to remove the belt with force, there’s actually an easier way to remove it without damaging the vacuum head or the belt.
Lift the right side of the brush roll’s black piece (it holds the brush roll) a little bit, which will allow for an easier removal of the belt.
Remove it with caution, don’t forget to be wearing protective gloves for additional protection.
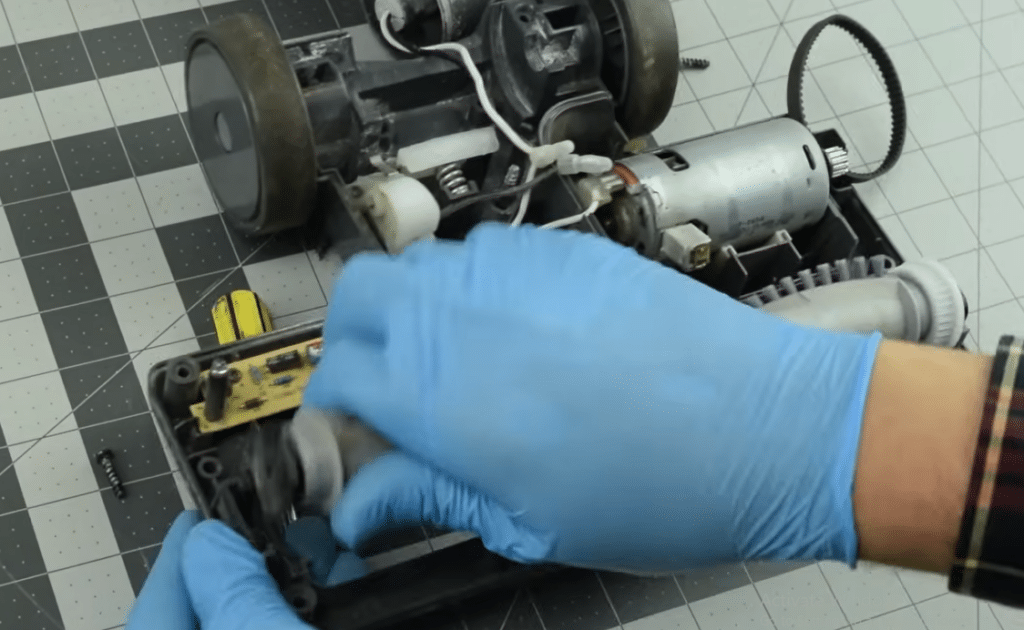
4. Removing the Roller Brush
You’ve already popped off the right side of the roller brush to easily remove the belt, all that’s left is remove the left side in the same manner.
It may require some force to remove it, but make sure the force is directed at the metal part, not the brush roll itself.
Remove the roller brush now, and sit it aside.
This picture shows how the belt has been removed to the side, and how the metal part of the roller brush is easy to remove from both sides.
5. Replace Connectors or Wheels If Necessary
According to a handful of experts, people attempt to remove roller brush from shark vacuum in an attempt to replace a faulty component.
If it’s faulty wheel or connectors error, it’s necessary to check the user manual as there are extra steps detailed there before you attempt to replace the faulty parts.
Don’t forget to check our other Shark Troubleshooting guides:
- Shark robot vacuum not charging
- How to reset shark robot vacuum
- Shark robot vacuum error 2
- Shark vacuum brush not spinning
- Overheating shark vacuum
- Shark vacuum brush roll indicator light not on
- Shark vacuum making weird suction noise
- Why does my shark vacuum keep stopping
- Shark Robot Vacuum Troubleshooting
- My Shark Vacuum Won’t Turn On
To Wrap Up
Whether you want to inspect the insides of your vacuum head for clogging or an error, or you’re just checking that everything is running smoothly, mastering How to Remove Roller Brush From Shark Vacuum has never been easier with this guide.
You have pictures explaining every step, and a video that helps you demonstrate everything properly.
Don’t forget that once you’re done, all you need to do is repeat the process backwards, by reinstalling the last thing you removed, and ending the process by putting the screws back in their places.
Here’s a video guide on How to Remove Roller Brush From Shark Vacuum:
![4 Best Heavy Duty Mop Models [Tested by Experts]](https://cleanersadvisor.com/wp-content/uploads/2023/03/Blog-Banner-for-Website-Content-22-350x190.png)

![4 Best Vacuums for Car Detailing [Tested by Experts]](https://cleanersadvisor.com/wp-content/uploads/2021/12/Best-Vacuums-for-Car-Detailing-1-350x190.png)
![4 Best Vacuums for Tile Floors [Tested & Tried]](https://cleanersadvisor.com/wp-content/uploads/2021/12/Best-Vacuums-for-Tile-Floors-1-350x190.png)
![4 Best Vacuums for Laminate Floors [Tested by Experts]](https://cleanersadvisor.com/wp-content/uploads/2021/12/Best-Vacuums-for-Laminate-Floors-1-350x190.png)