Published by Ahmad Jamal on May 13, 2023 | Last updated on May 20, 2023
I’ve had my fair share of unboxing vacuums here and there, testing, taking apart, reassembling, and more!
Mastering this craft helped me understand how those vacuums operate, what makes them perfect, and how to utilize them for the best.
In this CleanersAdvisor guide, I’ll teach you How to Take Apart Shark Lift Away Vacuum in a step by step manner, explaining in depth what you should do in each step.
In this guide, we’ll work together on NV352, which is as economical as a great vacuum can be at $159.99.
It’s similar to other navigator lift away vacuums like NV355, NV356e, NV351, …etc.
Let’s start by explaining what this vacuum offers, why you should know How to Take Apart Shark Lift Away Vacuum, before explaining the step by step method.
What Is a Shark Lift Away Vacuum?
Let’s start by establishing that shark vacuums – in general- are some of the finest and most selling around the globe, due to their versatility and durability.
As for the Shark Lift Away Vacuums, they are versatile, durable, economical, powerful, and multi-tasking.
The Shark Lift Away -we’ll demonstrate on- did even secure a spot at our best vacuum under $200 guide, in which we reviewed many great vacuums on different features, and it ticked most of those desirable features.
Why Should You How to Take Apart Shark Lift Away Vacuum?
Mastering How to Take Apart Shark Lift Away Vacuum means you’ll have a closer look at how your vacuum operates properly, and which parts do their designated tasks.
Additionally, it’ll help you remove damaged parts when you encounter vacuum errors or suddenly face specific issues when you’re vacuuming.
Moreover, it’ll allow you to clean each part separately, especially those that require consistent maintenance.
What You’ll Need Before Taking Apart Shark Lift Away Vacuum?
Here’s what you need in order to take apart your vacuum properly:
- Shark Vacuum Screwdriver (or any suitable ones)
- Gloves
- A Clean Table to Work On
- Small Area Where You Temporarily Store Screws
- Your Vacuums User Manual for Guidance
- Needle Nose Pliers
How to Take Apart Shark Lift Away Vacuum
To allow a better grasp on every step in your path towards mastering How to Take Apart Shark Lift Away Vacuum, here are the steps altogether, and afterward you’ll find each step simplified and explained in depth:
1. Start from the Bottom: Remove the Base Plate
2. Brush Roll Motor
3. Circuit Board
4. Disassemble the Elbow
5. Side Latches
6. Screws
1. Start from the Bottom: Remove the Base Plate
Removing the base plate will provide you with access to multiple important parts you’ll need to take away, including the brush bar, the belt, the circuit board, and the brush bar motor.
Remove 8 different screws that you can locate on and under the base plate altogether, there are 2 screws under the front wheels and 2 more between the large back ones.
This’ll allow you to remove the base plate, paving the way towards removing more easier-to-access parts now.

2. Brush Roll Motor
Generally speaking, older shark vacuum models don’t have their brush roll motor installed with screws, and you can just lift them with little to no trouble.
However, newer models have 2 screws at the side, remove them, then remove the circuit board leads using a pair of needle nose pliers, as they can get deeper into the board without a problem.

3. Circuit Board
Remove the 2 screws holding the circuit board in place, and remove the board with ease, and put it on the clean table.
If you’re looking to replace the brush roll motor, make sure to replace its circuit board as it’ll be as damaged as the first in this situation.
Once you’ve removed the 2 screws holding the circuit board, you’ll be able to remove the whole swivel unit from the base plate.

4. Disassemble the Elbow
Next up is the elbow, or the motor housing unit.
Remove the swiveling elbow shaped pipe that houses the motor unit, by getting a good grip on it with both your hands, then pulling it towards you.
This gets you towards side latches.

5. Side Latches
You’ve already removed nearly 90% of the components, now it’s time to remove the side latches.
If your vacuum features a HEPA filter at the front, attend to it first and remove it before attending to side latches.
Now, you’ll need some power to pressure the center hole punch in order to disengage the dowel pins that are holding the latches in their place.
Once you put enough pressure on it, you’ll disengage the pins, then all that’s left is removing the top filter as well, it may look dirty if this is not your first time taking apart your vacuum, since you’ve already used it for a couple of cleaning chores.

6. Screws
There are 6 other screws on the front plate, some of them were even hidden under the “loss of suction” sticker, but you can easily locate them after reading our guide.
Remove those screws, and remove two screws from around the back of the handle holder.
Another 2 visible screws makes 10 screws that need to be removed in order to release the motor from the housing.
This concludes everything you need to learn about How to Take Apart Shark Lift Away Vacuum.
How to Take Apart Shark Lift Away Vacuum Then Clean It: A Complete Guide:
How to Take Apart Shark Lift Away Vacuum: A Full Guide:
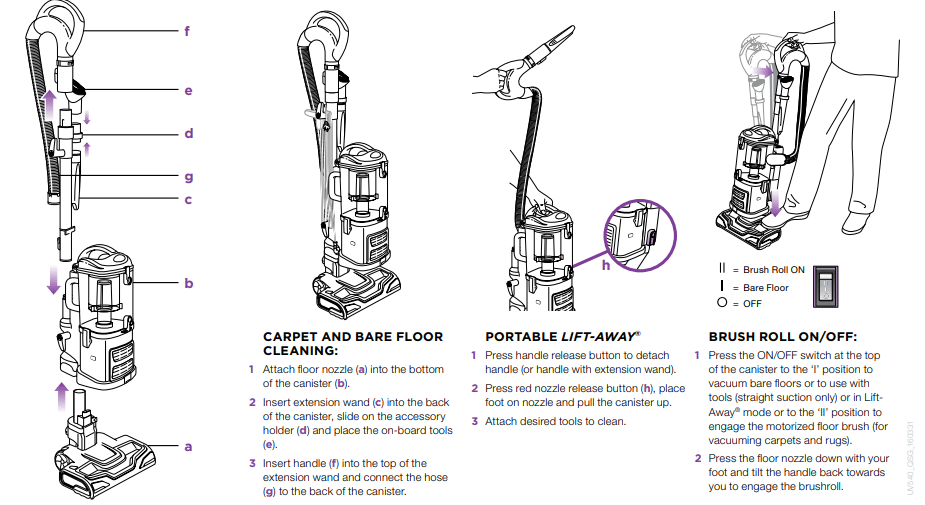
How to Assemble Shark Lift Away Vacuum
You’ve already taken apart every single component of your shark lift away vacuum, but how would you assemble it properly if you’re done with why you have taken it apart?
This graphic shows you exactly How to Assemble Shark Lift Away Vacuum according to Shark themselves.
Advanced Tips for Taking Apart Shark Lift Away Vacuum
1. If it’s your first time, write everything you do down, or better, videotape yourself so you can have an easier time reassembling it all back together.
2. Never have kids or pets around, a single lost screw can make your job ten times harder.
3. Have a relative or a friend who’s a professional in the field or at least have prior experience be present at your first time, it’ll help you dearly.
To Wrap Up
This CleanersAdvisor guide presented you with everything you need to know about How to Take Apart Shark Lift Away Vacuum.
You have all the items and equipment you need, the step by step methods you need to carry out, and advanced tips to top it all together.
If you have any questions on How to Take Apart Shark Lift Away Vacuum or you have different models, feel free to ask us about them in the comments section below.
![4 Best Heavy Duty Mop Models [Tested by Experts]](https://cleanersadvisor.com/wp-content/uploads/2023/03/Blog-Banner-for-Website-Content-22-350x190.png)

![4 Best Vacuums for Car Detailing [Tested by Experts]](https://cleanersadvisor.com/wp-content/uploads/2021/12/Best-Vacuums-for-Car-Detailing-1-350x190.png)
![4 Best Vacuums for Tile Floors [Tested & Tried]](https://cleanersadvisor.com/wp-content/uploads/2021/12/Best-Vacuums-for-Tile-Floors-1-350x190.png)
![4 Best Vacuums for Laminate Floors [Tested by Experts]](https://cleanersadvisor.com/wp-content/uploads/2021/12/Best-Vacuums-for-Laminate-Floors-1-350x190.png)